What’s new in Shader Graph 2021.2


Update: Now included in 2021 LTS
With the release of Unity 2021.2, we introduced some exciting new features in Shader Graph such as Surface Options support in the Universal Render Pipeline (URP), Custom Interpolators, and Blackboard Categories, which greatly improve artist workflows and shader performance.
In this blog post, we are going to use a previously released Unity project, the Viking Village, to walk you through the process of recreating some of the shaders used in this project utilizing these new Shader Graph features.
Getting started with the Viking Village asset package
You can download the Viking Village URP asset package from the Asset Store. In this demo project, I created a new URP project using Unity’s 2021.2 beta 7 version with the URP template. Once you have the new project opened up, download and import the Viking Village URP pack into this project. You can download the water and the shader examples here.
URP Surface Options
The first feature we want to demonstrate is the support for URP Surface Options. This feature allows you to expose the properties of the Surface Options from a Lit or Unlit Shader Graph shader to the Material Inspector. You can make selections of common properties such as Surface Type, Alpha Clipping, or Shadows on the Material Inspector level by enabling the Allow Material Override option. Let’s take a closer look at this option in this example project.

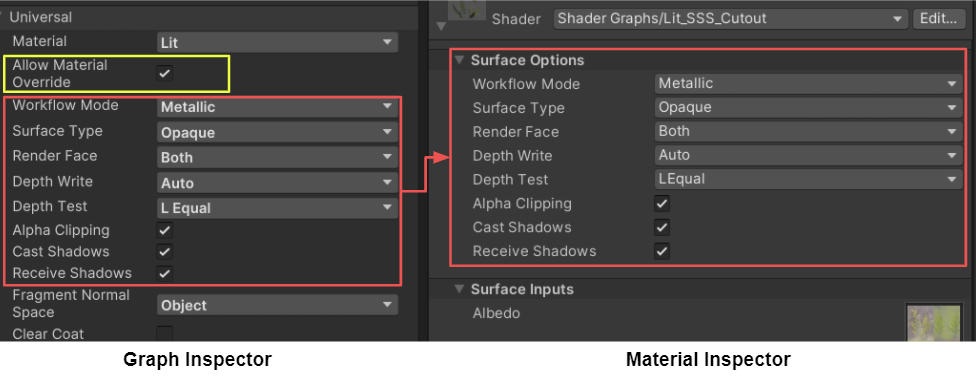
This Viking Village URP package includes a lot of different materials. In many cases, the materials have different surface option settings. However, the shaders used in the materials might not have very big differences. The new option “Allow Material Override” on the Graph Inspector allows you to override the surface option in Shader Graph per Material instance, and, as a result, you can create materials with different settings based on a single Shader Graph asset.
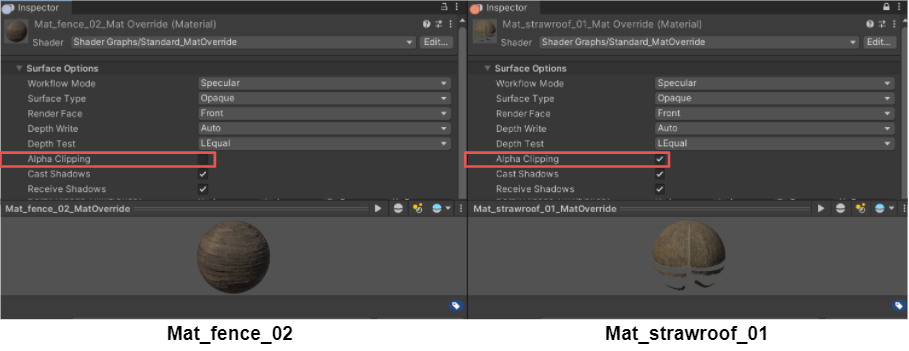
Let’s look at some examples. Mat_fence_02.mat in the project is using standard.shadergraph, and Mat_strawroof_01.mat is using standard_AlphaClip.shadergraph, which is the Alpha Clipping-enabled version of the standard.shadergraph. After enabling the “Allow Material Override” option in the Graph Inspector, with the same shader you can have different variants of materials with Alpha Clip controlled on the Material level.

With the “Allow Material Override” option enabled, you can also switch easily between the Metallic-Roughness workflow and Specular-Glossiness workflow on the Material Inspector. Below is a simple table showing the differences between the two workflows. For more information, you can take a look at this page.

Take the Lit_SSS_Cutout.shadergraph in the project as an example. This shader is used for different vegetation materials in the project and is set to the Metallic workflow by default. If we only want to convert one specific material utilizing the shader into the Specular workflow, with the “Allow Material Override” option enabled we can override the settings on the Material Inspector while not touching the other materials which are also using the shader.
Custom Interpolators
Now that you have become familiar with the project and some of the shader assets, next we would like to show you an awesome feature added to the Shader Graph, which we have named the Custom Interpolators.

With Custom Interpolators, you will be able to pass information from the vertex stage to the fragment stage, whether it’s vertex data or the results of custom calculations in the vertex stage for better shader performance.
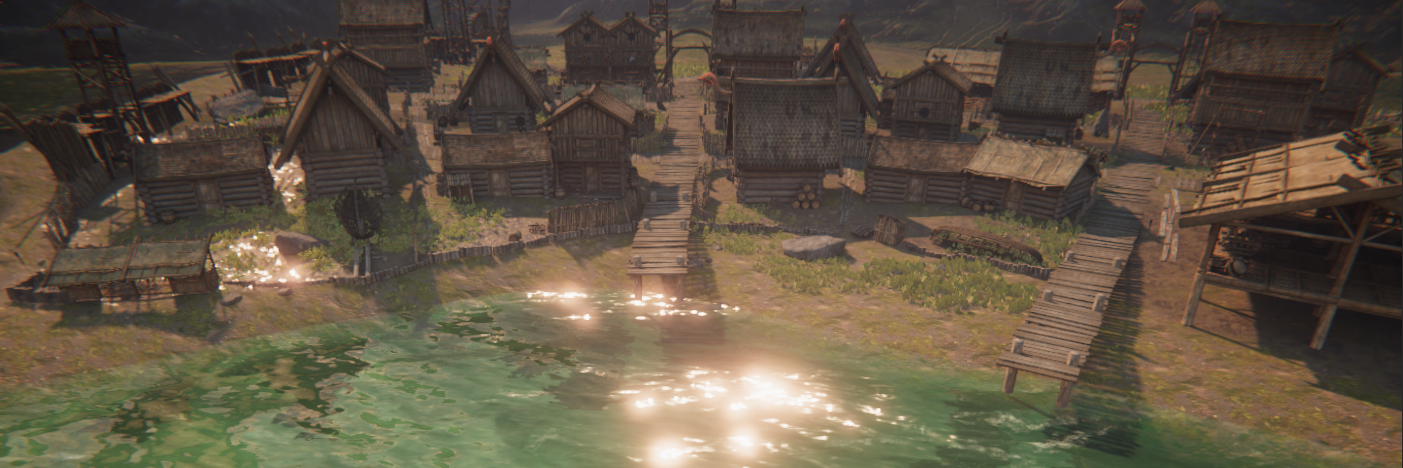
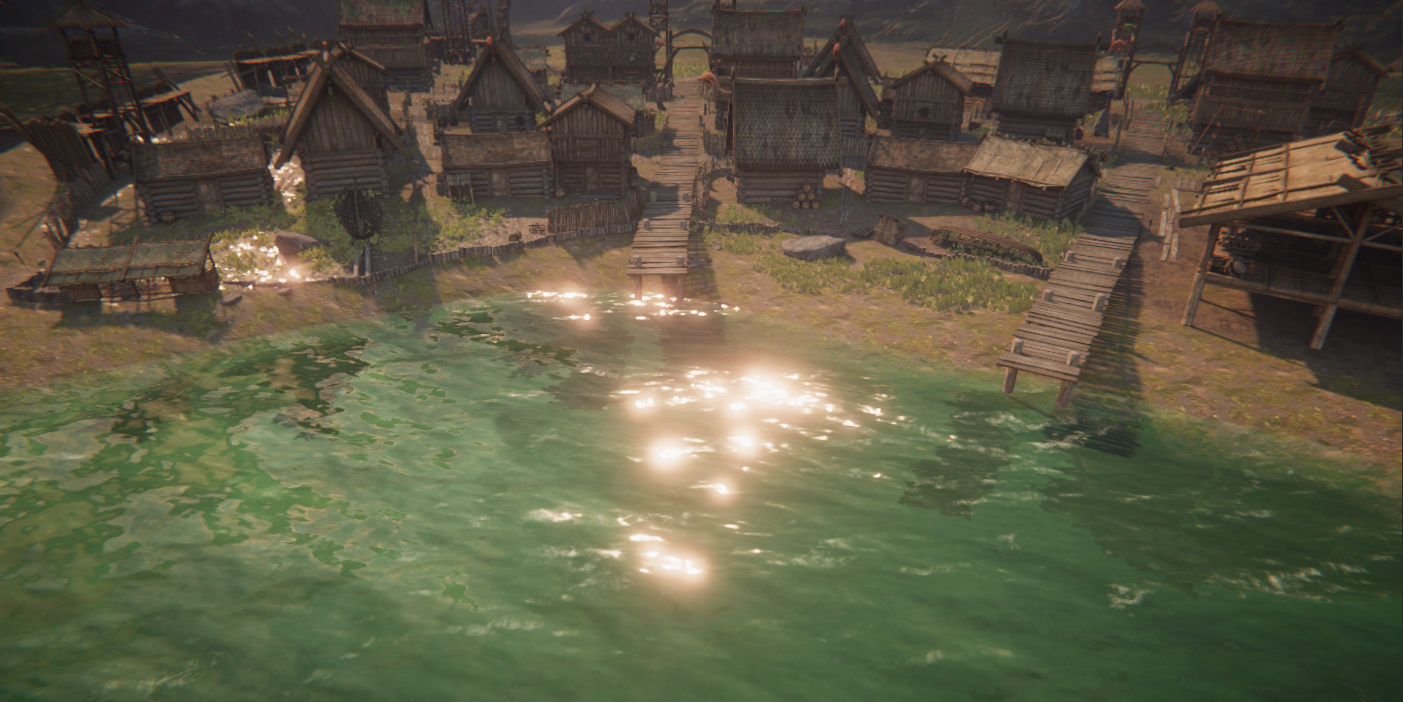
Here, we are going to borrow the water shader from this Master Stack blog post to demonstrate. In order to make the water shader blend better into the Viking Village environment, we’re going to add some reflection and refraction.

While it’s different from the Master Stack demo, we made improvements to the foam so now it also appears in the water body.

We are tiling and offsetting the UVs with a Simple Noise Node to get some distortion effects on the foam texture. The foam texture itself utilizes the RGB channels to store foam textures with different densities. For a more realistic result, different channels are distorted in opposite directions. To make the foam less stiff, we use the normal maps from the waves as a mask so that the foam can blend in with the waves naturally. The calculations of the body foam are operated during the vertex stage for better shader performance.

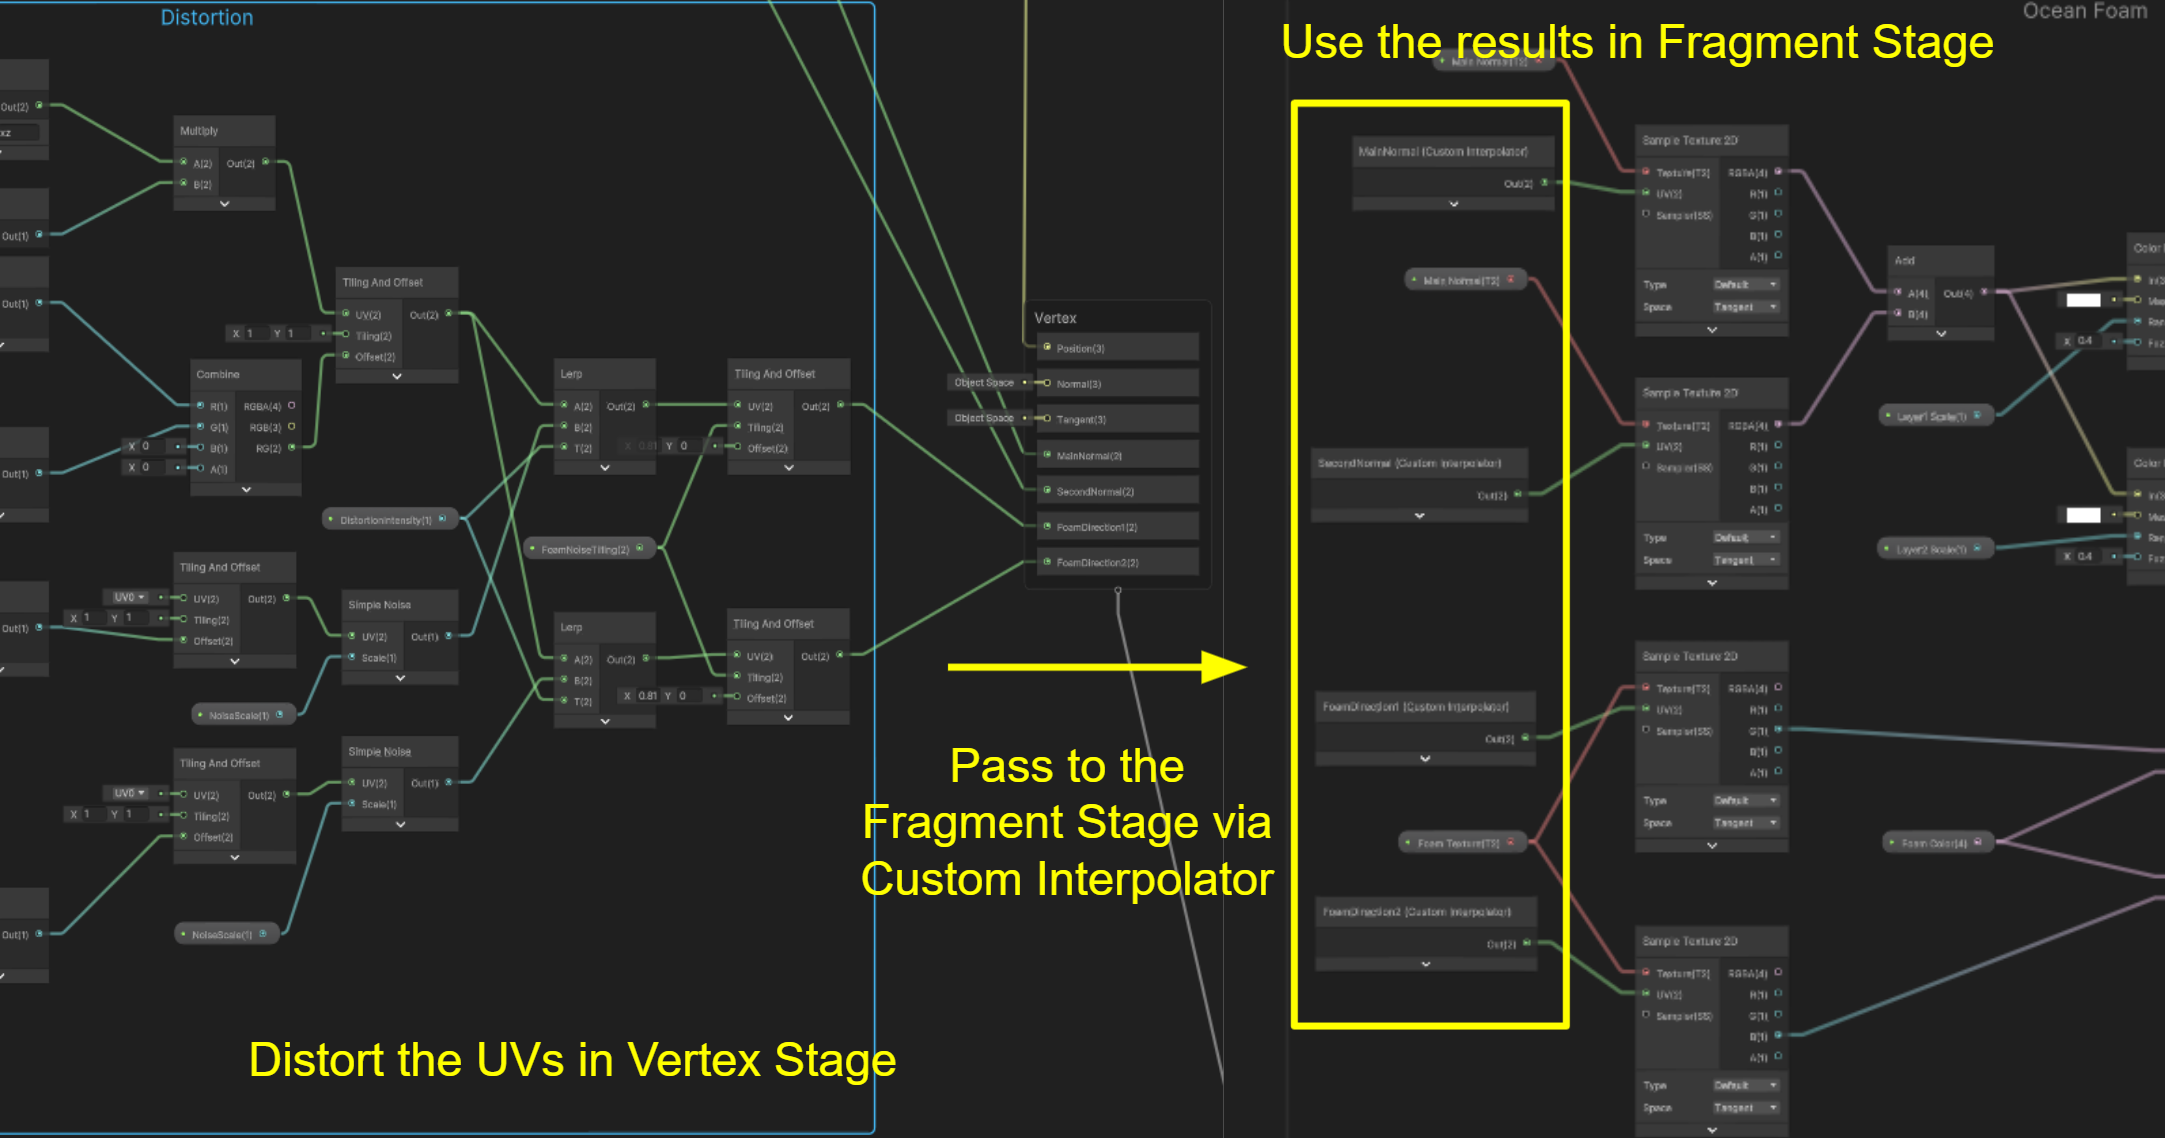
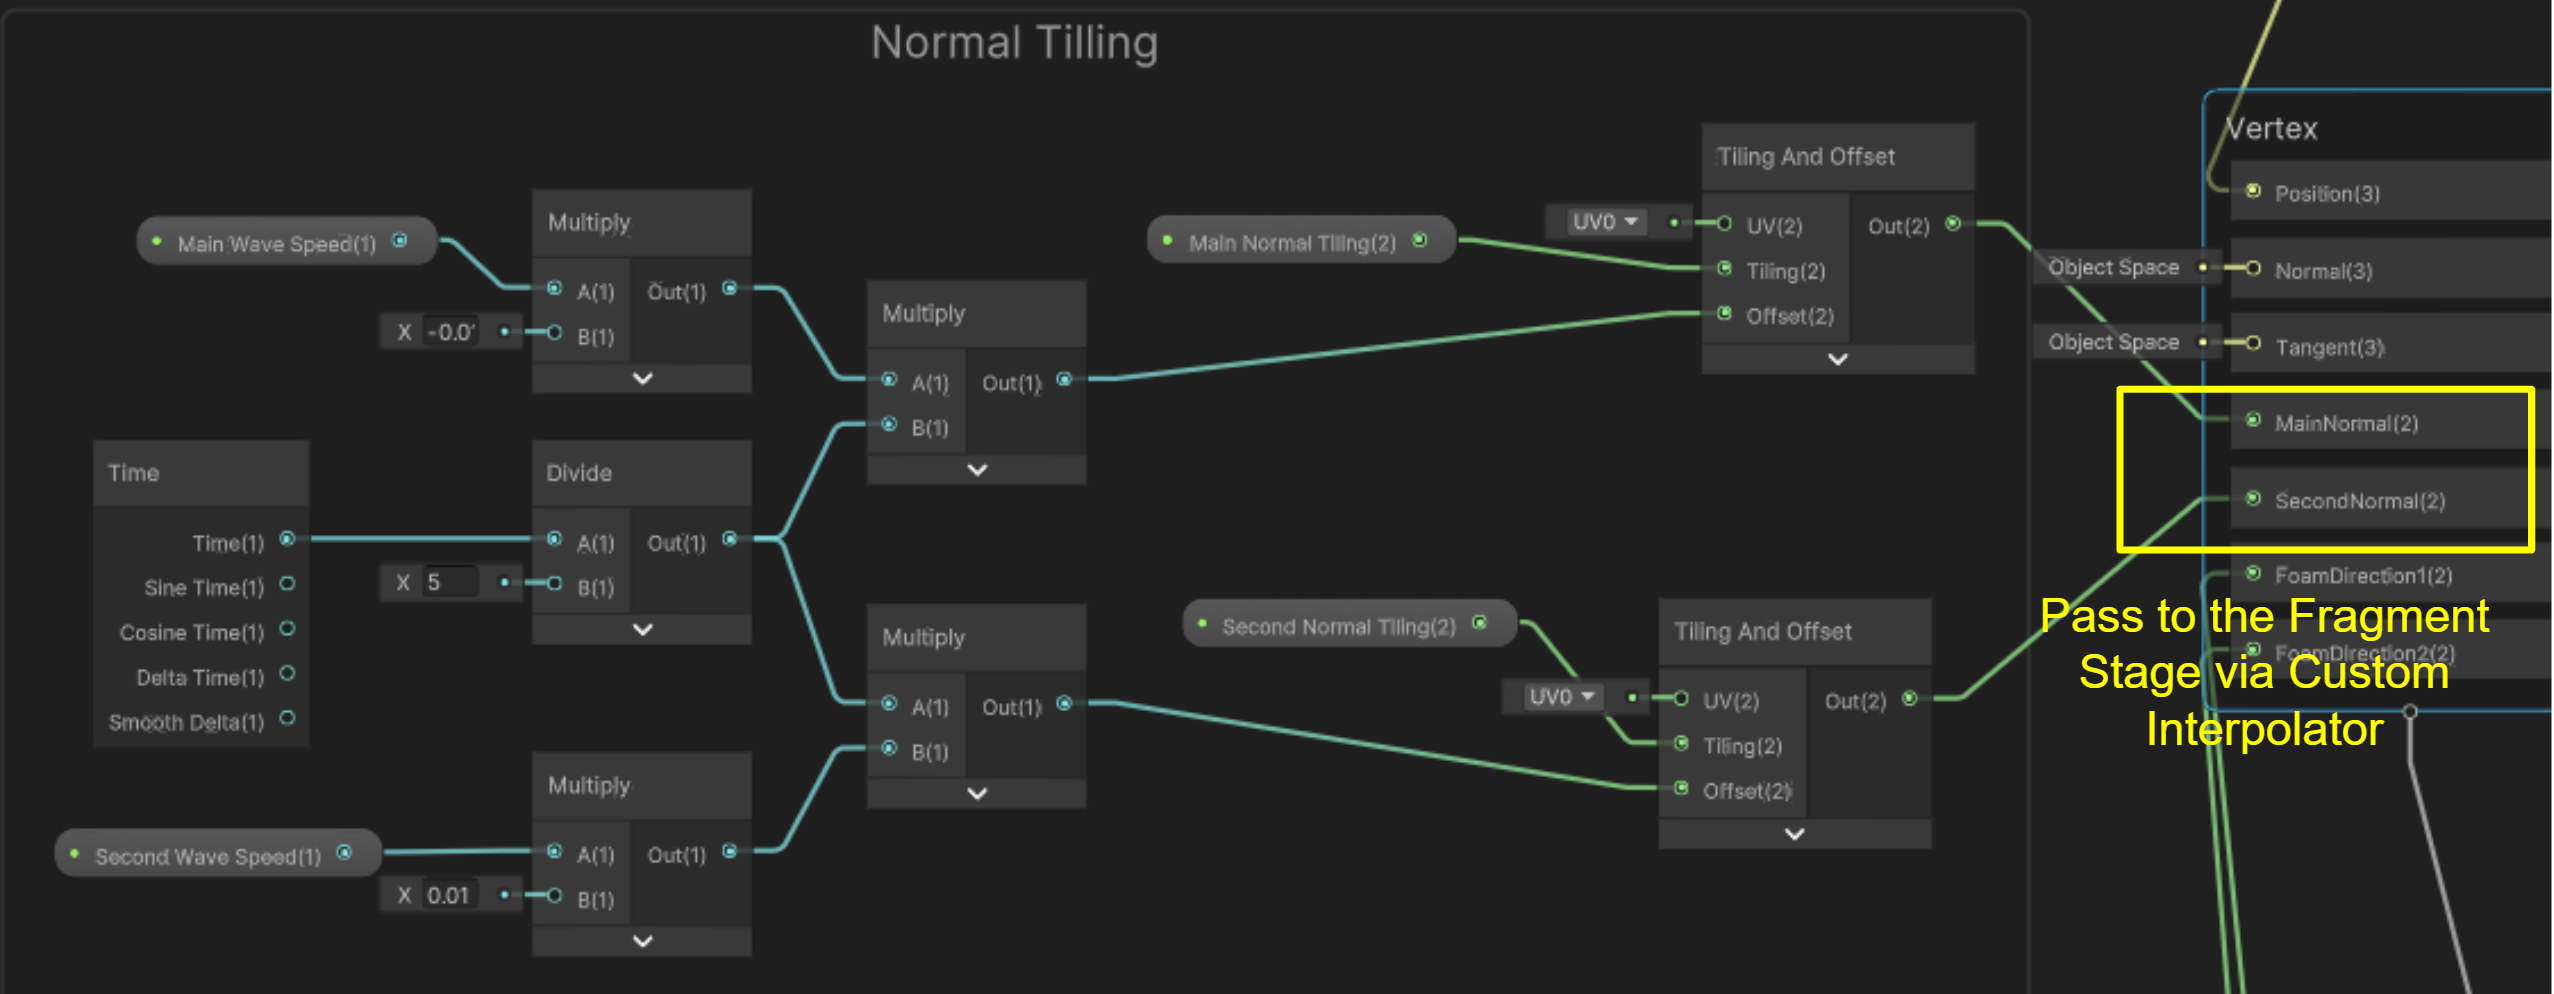
Let’s take a look at the tiling of normal maps in the shader. In order to achieve a better wave result, the original shader is tiling two normal maps in different directions and the calculations are all done in a per-pixel manner. Here, with the Custom Interpolators’ support, we can now move the UV tiling part to the vertex stage.

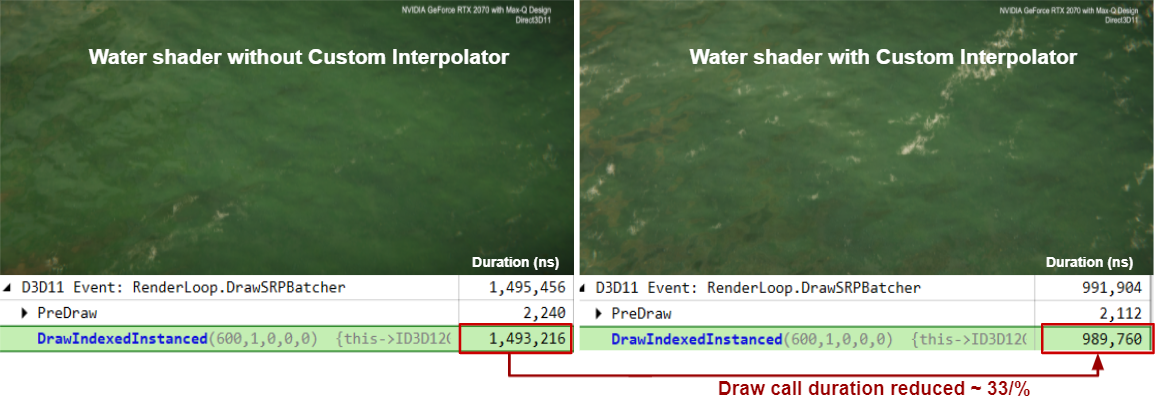
To see the performance improvement of using the Custom Interpolators, we built two builds with only swapping the water shaders. One water shader used Custom Interpolators, and the other one didn’t. We used PIX to capture a frame from each build to analyze the rendering cost on the GPU. Very noticeably, we can see the draw call duration for the water shader has significantly reduced by 33% in the shader that’s using the Custom Interpolators.

One thing that you need to be aware of when using the Custom Interpolators is that operations performed in the fragment stage are executed more often than in the vertex stage. In some cases, moving calculations to the vertex stage might cause minor details loss on the visual result. The Custom Interpolator feature supports a maximum of 32 channels. Different platforms and GPUs have different interpolator variable limits. For more information, please see the Shader Graph manual.
Blackboard Categories
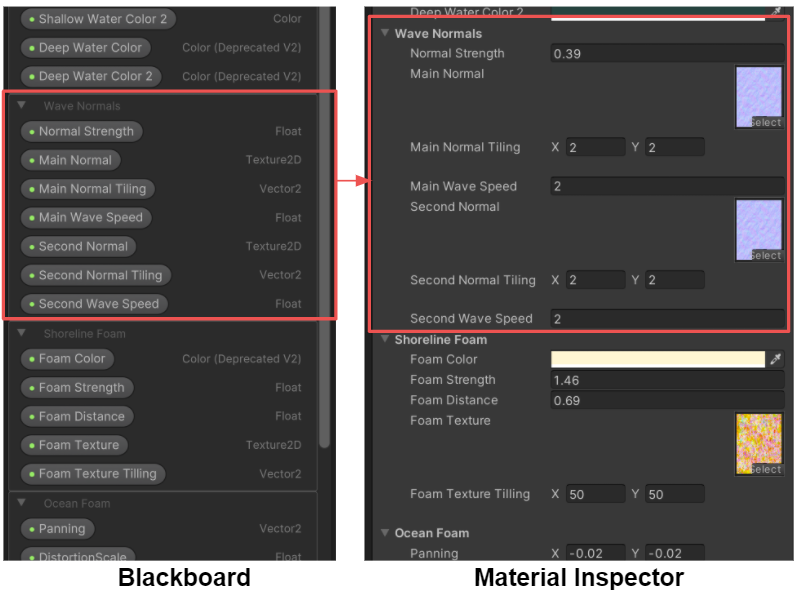
As shaders gain complexity, numerous properties can be difficult to navigate on the Blackboard. Now you will be able to create custom groups of properties by using the new Blackboard Categories and exposing them as expandable sections in the Material Inspector.
I’m going to continue using the water shader as an example. In the Blackboard within the Shader Graph, I grouped all the normal map properties into a category called Wave Normal. Then, when I was working in the scene and wanted to tweak the property values in the Material Inspector, I could easily navigate to this group. I can also collapse it to save space in the Inspector.

All the features we have talked about in this blog post are now available in the latest Shader Graph package alongside Unity 2021.2. If you have any feedback or want to learn more about Shader Graph, feel free to join our forum space or find us on Discord. You can also visit our Productboard for feature planning and updates.
Is this article helpful for you?
Thank you for your feedback!
- Unity Labs
- Copyright © 2024 Unity Technologies