Improving job system performance scaling in 2022.2 – part 1: Background and API


In 2022.2 and 2021.3.14f1, we’ve improved the scheduling cost and performance scaling of the Unity job system. In this two-part article, I’ll offer a brief recap of parallel programming and job systems, discuss job system overhead, and share Unity’s approach to mitigating it.
In part one, we cover background information on parallel programming and the job system API. If you’re already familiar with parallelism, feel free to skim and skip to part two.
Background on parallelism
In the 2017.3 release, a public C# API was added for the internal C++ Unity job system, allowing users to write small functions called “jobs” which are executed asynchronously. The intention behind using jobs instead of plain old functions is to provide an API that makes it easy, safe, and efficient to allow code that would otherwise run on the main thread to instead run on job “worker” threads, ideally in parallel. This helps to reduce the overall amount of wall time the main thread needs to complete a game’s simulation. Using the job system for your CPU work can provide significant performance improvements and allow your game’s performance to scale naturally as the hardware your game runs on improves.
If you think of computation as a finite resource, a single CPU core can only do so much computational “work” in a given period of time. For example, if a single threaded game needs its simulation Update() to take no more than 16ms, but it currently takes 24ms, then the CPU has too much work to do – more time is needed. In order to hit a target of 16ms, there are only two options: make the CPU go faster (e.g., raise the minimum specs for your game – normally not a great option), or do less work.
void Update()
{
    // <lots of simulation logic...>
}


Ultimately, you need to eliminate 8ms of computational work.That typically means improving algorithms, spreading subsystem work across multiple frames, removing redundant work that can accumulate during development, etc. If this still doesn’t get you to your performance target, you may need to reduce game simulation complexity by cutting content and gameplay, for example, by reducing the number of enemies allowed to be spawned at once – which is certainly not ideal.
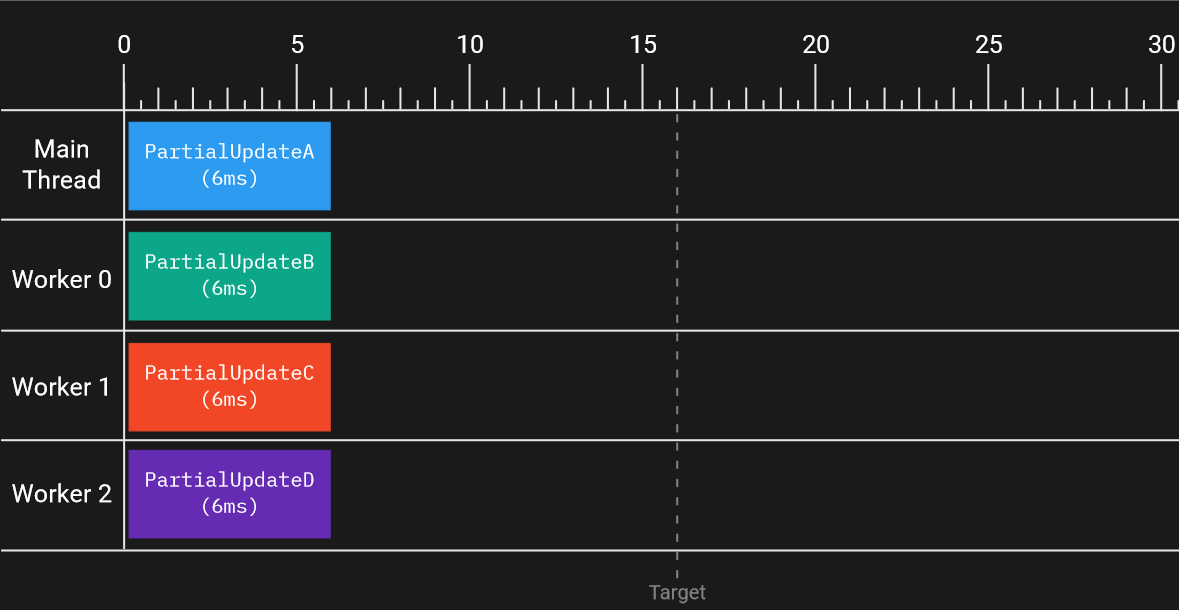
What if, instead of eliminating work, we give the work to another CPU core to run on? Nowadays, most CPUs are multi-core, which means the available single-threaded computational power can be multiplied by the number of cores the CPU has. If we could magically and safely divide all the work currently in the Update() function between two CPU cores, the 24ms Update() work could be run in two simultaneous 12ms chunks. This would get us well below the target of 16ms. Further, if we could divide the work into four parallel chunks and run them on four cores, then the Update() would take only 6ms!
This type of work division and running on all available cores is known as performance scaling. If you add more cores, you can ideally run more work in parallel, reducing the wall time of the Update() without code changes.
void Update()
{
    // Some magic has split our logic into 4 equal parts
    // that can run in parallel. Wowee!
    PartialUpdateA();
    PartialUpdateB();
    PartialUpdateC();
    PartialUpdateD();
}

Alas, this is fantasy. Nothing is going to divide the Update() function into pieces and run them on separate cores without some help. Even if we switched to a CPU with 128 cores, the 24ms Update() above will still take 24ms, provided both CPUs have the same clock rate. What a waste of potential! How, then, can we write applications to take advantage of all available CPU cores and increase parallelism?
One approach is multithreading. That is, your program creates threads to run a function which the operating system will schedule to run for you. If your CPU has multiple cores, then multiple threads can run at the same time, each on their own core. If there are more threads than available cores, the operating system is responsible for determining which thread gets to run on a core – and for how long – before it switches to another thread, a process called context switching.
Multithreaded programming comes with a bunch of complications, however. In the magical scenario above, the Update() function was evenly divided into four partial updates. But in reality, you likely wouldn’t be able to do something so simple. Since the threads will run simultaneously, you need to be careful when they read and write to the same data at the same time, in order to keep them from corrupting each other’s calculations.
This usually involves using locking synchronization primitives, like a mutex or semaphore, to control access to shared state between threads. These primitives usually limit how much parallelism specific sections of code can have (usually opting for none at all) by “locking” other threads, preventing them from running the section until the lock holder is done and “unlocks” the section for any waiting threads. This reduces how much performance you get by using multiple threads since you aren’t running in parallel all the time, but it does ensure programs remain correct.
It also likely doesn’t make sense to run some parts of your update in parallel due to data dependencies. For example, almost all games need to read input from a controller, store that input in an input buffer, and then read the input buffer and react based on the values.
void PartialUpdateA()
{
    // Write to m_InputBuffer with the controller state
    ReadControllerState(out m_InputBuffer);
}

void PartialUpdateB()
{
    // Read m_InputBuffer and start a player
    // jump animation if the jump button was pressed
    if(m_InputBuffer.IsJumpPressed())
        PlayerJump();
}
It wouldn’t make sense to have code reading the input buffer to decide if a character should jump executing at the same time as the code writing to the input buffer for that frame’s update. Even if you used a mutex to make sure reading and writing to m_InputBuffer was safe, you always want m_InputBuffer to be written to first and then the m_InputBuffer reading code to run second, so you know whether the jump button was pressed for the current frame (and not one in the past). Such data dependencies are common and normal, but will decrease the amount of parallelism possible.
There are many approaches to writing a multithreaded program. You can use platform-specific APIs for creating and managing threads directly, or use various APIs that provide an abstraction to help manage some of the complications of multithreaded programming.
A job system is one such abstraction. It provides the means to break up parts of your single-threaded code into logical blocks, isolate what data is needed by that code, control who accesses that data simultaneously, and run as many blocks of code in parallel as possible to try and utilize all computational power available on the CPU as needed.
Job system API
Today, we cannot divide arbitrary functions into pieces automatically, so Unity provides a job API that enables users to convert functions into small logical blocks. From there, the job system takes care of making those pieces run in parallel.
The job system is made up of a few core components:
- Jobs
- Job handles
- Job scheduler
public struct MyJob : IJob
{
    public NativeArray<int> Data;
    public void Execute()
    {
        // Do some work using our Data member
    }
}
As mentioned before, a job is just a function and some data, but this encapsulation is useful, as it reduces the scope of which specific data the job will read from or write to.
var myJob = new MyJob() { Data = someNativeArray };
var jobHandle = myJob.Schedule();
Once a job instance is created, it needs to be scheduled with the job system. This is done with the .Schedule() method added to all job types via C#’s extension mechanism. To identify and keep track of the scheduled job, a JobHandle is provided.
Since job handles identify scheduled jobs, they can be used to set up job dependencies. Job dependencies guarantee that a scheduled job won’t start executing until its dependencies have completed. As a direct result, they also tell us when different jobs are allowed to run in parallel by creating a directed acyclic job graph.
var myJob = new MyJob() { Data = someNativeArray };
var jobHandle = myJob.Schedule();

// WritingJob writes to someNativeArray so make sure it runs
// after MyJob is done (since it uses someNativeArray as well).
// That is, declare writingJob to have a dependency on myJob by
// passing in the JobHandle for MyJob to writingJob.Schedule
var writingJob = new WritingJob() { Data = someNativeArray };
var writingJobHandle = writingJob.Schedule(jobHandle);
Finally, as jobs are scheduled, the job scheduler is responsible for keeping track of scheduled jobs (mapping JobHandles to the job instances scheduled) and ensuring jobs start running as quickly as possible. How this is done is important, as the design and usage patterns of the job system can potentially conflict in non-obvious ways, leading to overhead costs that eat into the performance gains of multithreaded programming. As users started adopting the C# job system, we began to see scenarios where job system overhead was higher than we’d like, which led to the improvements to Unity’s internal job system implementation in the 2022.2 Tech Stream.
Stay tuned for part two, which will explore where overhead in the C# job system comes from and how it has been reduced in Unity 2022.2.
If you have questions or want to learn more, visit us in the C# Job System forum. You can also connect with me directly through the Unity Discord at username @Antifreeze#2763. Be sure to watch for new technical blogs from other Unity developers as part of the ongoing Tech from the Trenches series.
Is this article helpful for you?
Thank you for your feedback!
- Unity Labs
- Copyright © 2024 Unity Technologies