Game ready: Building the ‘Ōhi’a lehua tree with SpeedTree, part 1


Not too long ago, the SpeedTree team started working on tree assets and scans from intentional locations. “When we travel, we look at plants… it’s second nature” (pun intended).
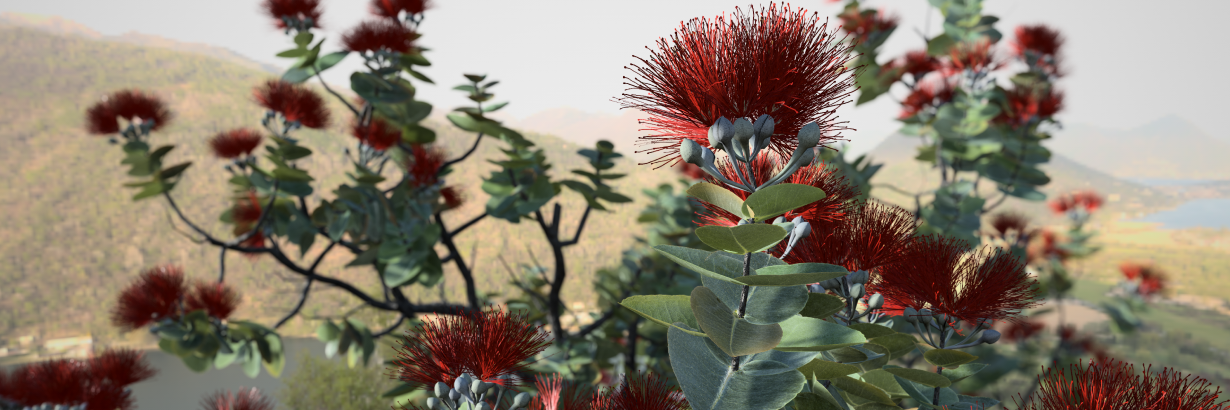
First, technical artist Mira Pichai traveled to the islands of Hawaii, where she fell in love with the ‘Ōhi’a lehua tree. The trip inspired the team to do a close study of this biome, then bring you this workflow and line of content.
The ‘Ōhi’a lehua is an incredible tree that also grows in shrub form, straight out of volcanic rock. It produces eye-catching flowers, succulent leaves, and uniquely colored buds, making it a complex species to build in the 3D space.
Read on for a breakdown of how three technical artists – Mira, Geneviève Gagnon, and I – recreated the ‘Ōhi’a lehua tree in SpeedTree, optimized for use in a game environment.
We took this tree to GDC 2023. If you’re looking for a quick introduction to SpeedTree, check out my abbreviated live tutorial.
Gathering references
To begin, Geneviève gathers reference materials and decides which pieces are needed to create the cluster file, breaking the tree down into various elements. It’s a bit like pulling a puzzle apart. The final model will be a trunk, a few big branches, some medium-sized ones, twigs, and the beautiful red flowers the tree is noted for.
Creating a cluster
A “cluster” is a texture file for the upper canopy, which you create by importing all of your texture assets into a new SpeedTree scene.
There’s no need to create brand-new assets if you have preexisting ones that are close enough. Here, I’m using recycled eucalyptus leaves from a previous project. These assets all share the same normal, gloss, and opacity map, so we save a lot of time that way. You can also do your variants directly into the Material Editor, for example, creating a dead leaf.
Once you have all your textures, you can begin to create cutouts or import a mesh.
The Cutout Editor and adding materials
To get started shaping branches, Geneviève almost always recommends starting with a tube generator for a better understanding of the modifications you’ll make. There are no default deformations assigned to it, so you really need to know what you’re doing. While you’re making your textures, if you don’t have a tight deadline, you can add as many details as you wish in the cluster file.
“Personally, this is my favorite part: making the textures,” Geneviève explains. “They’re like little pieces of art.”
|
Geneviève recommends that you always test what you’re doing. It’s very easy to get lost in the details, so when you’ve created something, bake it, then create a super quick model and send it to the engine or DCC to see how it looks from a player’s perspective. |
Cluster variations: Add new versions based on the procedural settings
Nature isn’t perfect, so removing some leaves and adding in a few damaged ones helps the tree look more natural. Additionally, you have to be aware of the final polycount goals while modeling for games. There is a flat effect that appears if you don’t have enough vertices. By checking your tree and lighting often in your game engine, you can adjust the balance in the spacing of the leaves.
Building the flower
Instead of sculpting in a separate program and then importing into SpeedTree, the smartest way to model flowers is directly in SpeedTree, thinking procedurally. Again, it’s a bit like a puzzle.
There’s a lot of back and forth when crafting vegetation. If you go ahead and bake something, you’re going to spend a lot of time redoing your work. But if you keep it procedural, then it’s going to be super easy to do things like apply modifications and remove petals.
Adding scene cameras
The final step before making the textures is to add the cameras. Just put the view perspective at the angle you want to bake your texture in, then you can drop a camera in. What you see in the preview is what you’re going to get. You can always change the position of the camera later.
Export your textures
To export the textures, you just have to select the camera you want to export from and choose the resolution first. Since you’re baking directly from the camera, the aspect ratio is going to be set for you. The export texture options allow you to add or remove map types as needed. It’s all you need to create a great PBR material. You could also create a script to export those materials for you in bulk with very specific requirements. If you’re adding seasonal variations, you can export them all from the same cluster file.
Cluster placement
Now you can start to piece everything together. For this tree’s structure, big branches are attached to the main trunk geometry, and on top of that is a set of twigs. Over the twigs, we have side views of the leaves, then the top view of the leaves and the flowers. These anchored textures make up a complex 3D branch and are pieced together somewhat like a puzzle.
Material cutouts and placing the clusters
Since this tree is a game environment asset, you’ll want to be conservative in adding a few vertices to ensure that the cutouts deform properly. You may have to refine and change the polycounts on each cutout in this stage of building.
If you’re tight for your texture budget in your project, just be aware that the more variants you have, the less space you’re going to have for each texture in your atlas. You probably don’t need as much variation as you would think. When put in context, having only two or three different types of branch can do the job, and no one will see the repetition.
In part two, we will focus on adding the final touches to the tree, including shaping the trunk, controlling branch shape, and adding wind effects.
Create your own exotic environment with the newly released Hawaiian asset collection. Not yet a SpeedTree user? Contact us for a free trial. Already a SpeedTree user? Make sure to check your download folder and update your version for new features and improvements. If you are an Enterprise customer and have questions about the update, please reach out directly.
Is this article helpful for you?
Thank you for your feedback!
- Unity Labs
- Copyright © 2024 Unity Technologies