Shedding some light on the Universal Render Pipeline for Unity 2021 LTS


Professional lighting requires a delicate balance between creating the desired mood for a scene and the performance and technical limitations of your target platforms. In this post, Steven Cannavan provides tips on lighting with the Universal Render Pipeline (URP) in Unity 2021 LTS.


As a 15-year veteran of the game development industry and a senior development consultant on the Accelerate Solutions – Games team, Steven specializes in Unity’s Scriptable Render Pipelines (SRP). He was also one of the main contributors to the recently released Introduction to the Universal Render Pipeline for advanced Unity creators e-book, which you can get here. The tips that follow (along with many others) can be found in the full version of the guide.
URP Lighting Settings
Let’s begin by looking at some key settings. To start, the majority of URP’s Global Lighting Settings can be found in the Universal Render Pipeline Asset, or URP Asset.
To view these settings, select the Universal Render Pipeline Asset in the Project window and open the Inspector. To adjust renderer-specific settings, select a Renderer Asset in the Project window (the URP Universal Renderer, for example) and adjust the settings for that renderer in the Inspector.
You can adjust Light Layer names by opening the Edit menu and selecting Project Settings > Graphics > URP Global Settings. To modify Scene settings, meanwhile, go to the Lighting window (Window > Rendering > Lighting).
The URP Asset
The URP Asset contains multiple settings that affect lighting. These are the Lighting and Shadows sections, but some also appear in the Rendering, Quality, and Post-processing sections of the Inspector.


Dynamic range
Dynamic range properties determine how Unity stores luminosity. Tonemapping and post-processing effects harness this luminosity data to achieve realistic effects.
To activate High dynamic range (HDR), open the URP Asset in the Inspector, expand the Quality settings, and enable the HDR property. If HDR is not active, URP uses Low dynamic range (LDR) by default. Keep HDR active in most cases to maintain top quality.
HDR that is inactive limits lighting results and other effects to a luminosity range of 0.0 and 1.0. While LDR provides potential performance and bandwidth benefits, it also affects visual fidelity.
When HDR is active, URP renders into an intermediate texture that supports values greater than 1.0. These values represent high luminosity, which you can combine with post-processing effects to produce more realistic visuals or simulate camera effects. At the end of the rendering process, URP resolves HDR content to an LDR format (either during post-processing or the final blit). URP can also apply Tonemapping during post-processing.
The LDR resolve is necessary as not all platforms support HDR output. For instance, URP does not support HDR output on platforms that are able to present HDR content.
Note: Support for HDR displays will be available for PC and console in URP for Unity 2022 LTS.

The most appropriate dynamic range option for your project depends on its artistic style and performance considerations. If your project has realistic visuals or you need a strong contrast between light and dark areas, then HDR is ideal. However, LDR can be a good choice for projects with more simplistic or stylized lighting, and no requirement for high-range post-processing effects like Bloom.

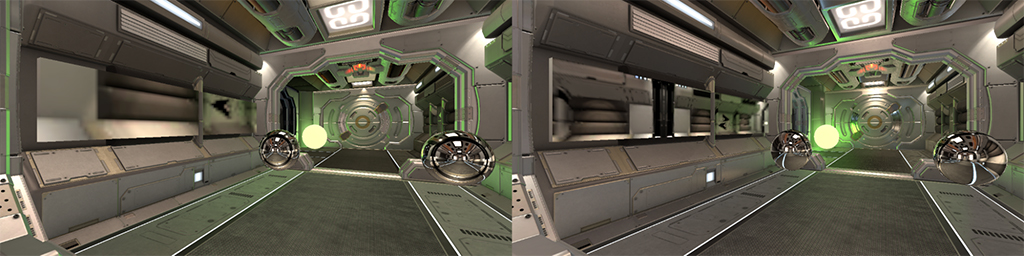
In the RenderDoc image above, there are areas outside of the 0.0–1.0 range due to specular reflection and an HDR skybox. In the final image, these contribute to the Bloom, making a more realistic-looking scene.
HDR also impacts performance. Its system resource needs depend on the texture format that you use and the additional steps URP must take to convert the image back into a format that can be displayed.
Float texture formats are typically larger, and so require more memory/bandwidth. Larger formats require more bits per pixel, and by extension, more memory and power to process. That’s problematic on low-end devices, as they can overheat. To solve this problem, URP tries to use the B10G11R11_UFloatPack32 API format (if the platform supports it and preserveFramebufferAlpha is disabled), which has bandwidth resource demands similar to LDR.
| Screen resolution | Format | Range | Bits per pixel | Size (MB) |
|---|---|---|---|---|
| 1920x1080 | R16G16B16A16_SFloat | HDR | 64 | 15.82 MB |
| 1920x1080 | B10G11R11_UFloatPack32 | HDR | 32 | 7.91 MB |
| 1920x1080 | R8G8B8A8_UNorm | LDR | 32 | 7.91 MB |
| 1920x1080 | R8G8B8A8_SRGB | LDR | 32 | 7.91 MB |
Note: R16G16B16A16_SFloat provides some benefits over its 32-bit counterpart, such as alpha support and no discoloration due to precision loss in the blue channel. That’s why in Unity 2022.2 and above, you can manually set it to use, or not use, the higher precision texture.
Lighting

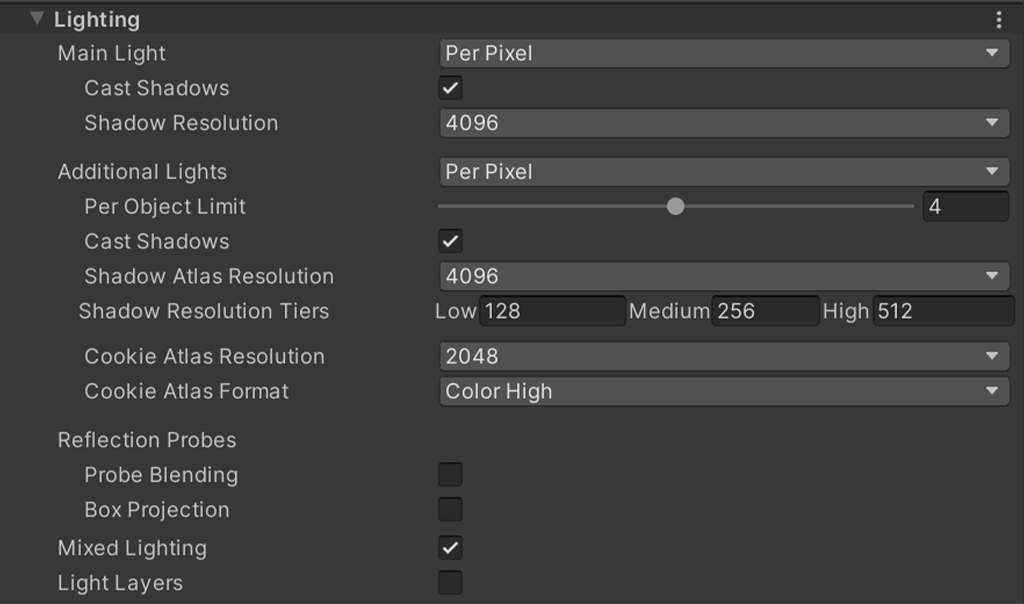
In the Lighting section of the URP Asset, you can change the settings for both the Main Light and Additional Lights. The Main Light is the most significant Directional light in your scene. Additional Lights are the remaining Directional, Spot, and Point lights. While a scene can include a large number of these lights, there is a general limit to the number onscreen and a Per Object Limit for the Forward Renderer path.
The Main Light is either the light you designate as the Sun Source in the scene’s Lighting Settings (Window > Rendering > Lighting > Environment) or the brightest real-time Directional light. In practice, this is usually the brightest Directional light with a Render Mode set to Auto or Important, and a Mode set to Mixed or Real-time.
Unity bases the brightness of Directional lights that use the Render Mode option Important or Auto on the Grayscale value of their Color, multiplied by the light’s Intensity, with a modifier for shadowing lights: (Red x 0.3 + Green x 0.59 + Blue x 0.11) x Intensity x Modifier
If you only have Not Important Directional lights in your scene, then URP compares light Intensity values to determine the Main Light. But seeing as Unity applies a modifier to shadowing lights, it might choose a dimmer light over a brighter one if the dimmer light has Cast Shadows active.
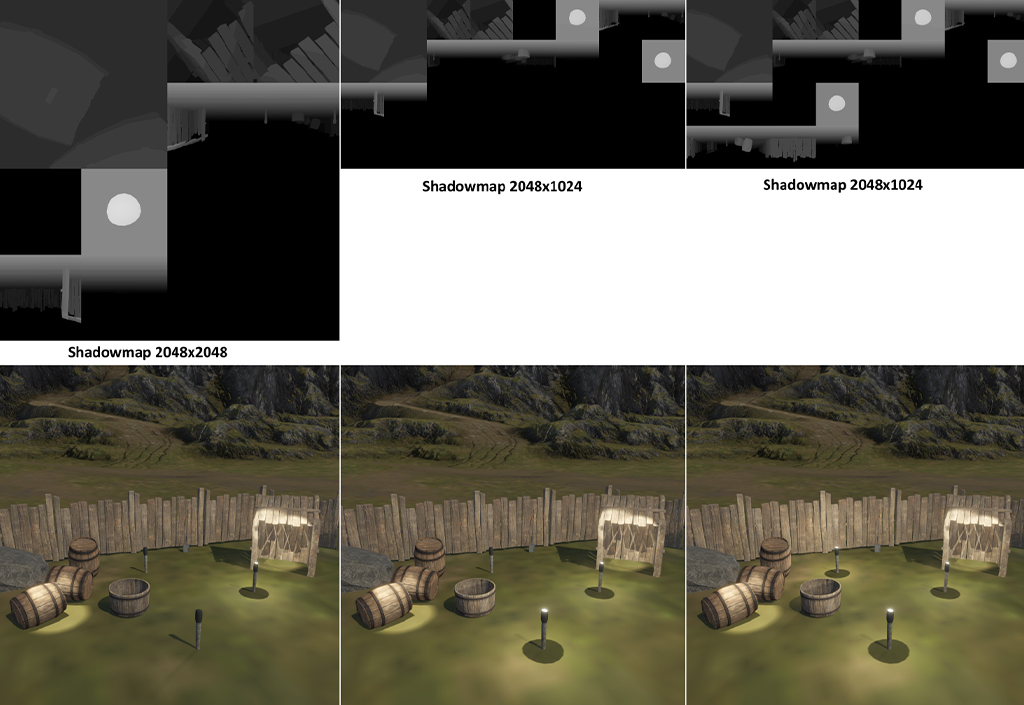
In the Lighting section, you can assign the Atlas size for both the Main Light and Additional Lights’ shadows. For the Main Light, this setting affects the Atlas URP that it uses for Cascade Shadows, with settings in the Shadows section of the URP Asset. In the Additional Lights section, you can set the Shadow Resolution tiers. URP attempts to fit all the visible lights with shadows into the Atlas based on their resolution (Custom, High, Medium, or Low).
However, if the size that URP requires to render these shadows at your preferred resolution is larger than the Atlas, URP scales down the shadows or potentially removes them altogether. This occurs if there isn’t enough space for the minimum possible light resolution (8x8 for Hard Shadows and 16x16 for Soft Shadows) or if you’ve hit a hardware limitation (on mobile). This means the quality of shadows from punctual lights can drastically change when you have a large number of lights visible or when a small number of lights take up a decent portion of the Atlas (i.e., Point lights require more space, six slices, on the Atlas).

There are a few strategies you can use to overcome this:
- Prioritize a light’s shadows based on the radius they affect: Screen Space or World Space.
- Lights at a far distance, or those that only affect a small percentage of the screen, are safe at Low or Medium resolutions.
- Alternatively, use High or Custom resolutions for lights that affect large sections of the visible geometry.
- To reduce Atlas size, try the following:
- Decrease the number of shadow-casting lights.
- Decrease the size of the Atlas that some or all tiers use.
- Avoid Point lights and use Spot lights whenever possible.
- Increase the size of the Atlas (the easiest way to solve this issue).
- Note that this option consumes memory and bandwidth resources that might not be feasible for low-end platforms.
- Manage resolutions programmatically:
- Have a manager class that periodically updates Resolution tiers in order of importance, such as estimated Screen Space or other critical factors for the application.
- Lights that increase or decrease in importance update their required Atlas size, which reduces pressure and ensures that more important lights get a bigger slice of the Atlas.
The Per Object Limit setting (under Additional Lights) limits the number of lights that can influence any object URP renders that uses the Forward Renderer path. So if the Universal Renderer uses the Forward path, this limit affects all objects. In the case of the Deferred path though, this limit only affects objects that use materials with the Forward Rendering technique (for example Complex Lit or Transparent materials).

When an object receives illumination from a number of lights that exceeds the total limit, Unity drops the least important lights. Both the Intensity of an object’s center and the Render Mode of the light determine which lights Unity drops. This can cause visible artifacts to pop in and out.
While increasing the limit can help, there is ultimately a hard limit of eight lights – and for low-end devices, it’s usually preferable to set an even lower limit for performance reasons. In most projects, this should not become an issue, but if it does, here are a few recommended workarounds:
- Optimize the lighting setup:
- Intensity and Real-time lights that are static in position are good candidates for switching to Baked Mode instead, which is significantly cheaper than real-time lighting.
- Reduce the complexity of the scene by removing or moving lights to different layers (affecting less geometry).
- More lights affect larger pieces of geometry, so if Deferred Rendering isn’t an option, and Unity cannot cull or remove the lights that affect problematic geometry, then you should consider breaking the large geometry into smaller pieces.
- Switch to the Deferred path:
- This has a higher bandwidth resource demand, which can be problematic on low-end devices, but provides many advantages when you want to support a large number of lights.
- Issues can arise with transparent objects and materials that use the Complex Lit shader as they still use the Forward path.
- Fake lighting effects:
- For some content, it can be simpler and cheaper to fake lighting in a shader rather than to use real lights.
- For example, you can fake a small light on equipment or clothing with the emissive channel in the Shader Graph, or use billboards and other meshes with a transparent emissive material to create fake Volumetric Lighting, which can be quite effective when combined with Bloom.
- Otherwise, you can use light cookies to create complex lighting setups with fewer lights.
Note: In Unity 2022.2 and above, the Forward+ Renderer is an option. It increases the number of lights that can affect a pixel and removes the Per Object Limit.
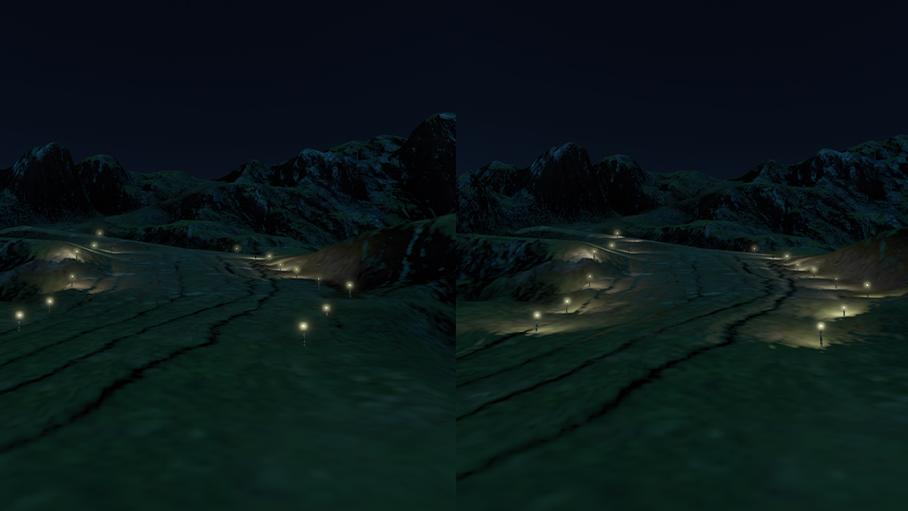
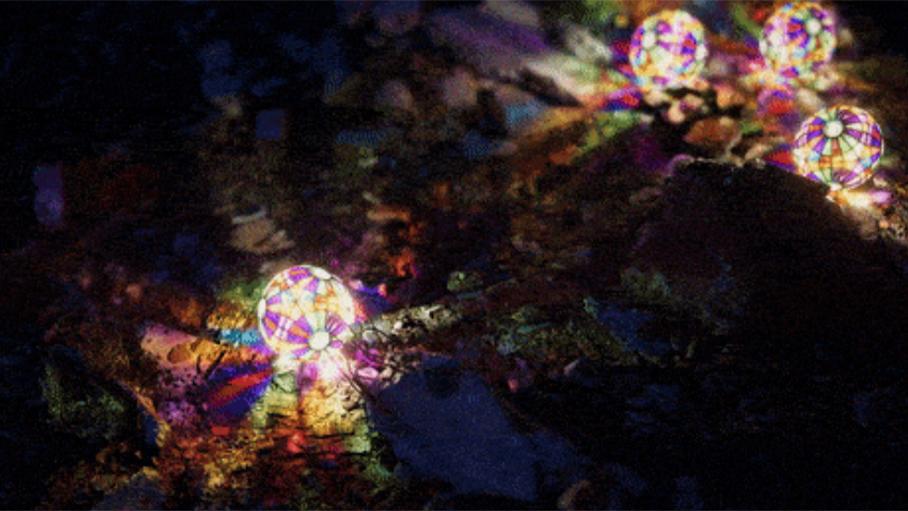
Light cookies
URP recently added support for light cookies to the Main Directional light. There is similar support available for Additional Lights, but they must share an Atlas between them. You can control the size of this Atlas with the Cookie Atlas Resolution and Cookie Atlas Format settings in the Additional Lights section.
As each punctual light with a cookie becomes visible, URP adds it to the Atlas. If there isn’t enough space in the Atlas, then URP scales down the cookies. If the light is no longer visible, it stays in the Atlas until a rebuild is necessary (i.e., if the entire Atlas scaling factor changes). This generally means that URP rarely updates the Atlas.
In practice, URP only updates slots when they change. This can happen when either a cookie uses a Render Texture or you reimport a cookie texture in the Editor. The resources required to use cookies should be low for most devices, but if you have issues with the quality of the image, you can revisit the size of the Atlas and the individual light cookie images. Not all lights are equal, and the same goes for cookie textures. To help free up space on the Atlas, just reduce the size of the least important cookie textures.
Of course, the Cookie Atlas Format has multiple options. The one most appropriate for your project depends on the memory requirements and source cookie textures.
The default option, Color High, should suffice in most cases, but you might want to consider other formats when:
- Your source textures are in Grayscale only:
- In this case, Grayscale Low or Grayscale High are the best possible options. If the source textures are 8-bit only, then Grayscale Low is the perfect fit (as it is in the R8_UNorm format). Grayscale High, meanwhile, is suitable if the project uses any 16-bit textures or Render Textures for a cookie (as it is in the R16_UNorm format).
- Memory and bandwidth are concerns for the project:
- In this case, select Color Low, which uses a 16-bit color format (if the device supports it) and can reduce the memory footprint, especially compared to Color High.
- Using an HDR texture as a cookie:
- In this case, use Color HDR to preserve its input values as HDR textures use floating point values that can take a larger range of values (exceeding 1.0). Remember that this means a light can potentially have a higher Intensity than what is set in the Editor.
Note: Cookies also increase resource requirements, so they might not be ideal for low-end platforms. If your project does not use cookies, then you can avoid this additional resource demand.
Reflection Probes
URP provides a couple of options for using Reflection Probes. You can set up a project to use Blended Reflection Probes or the Box Projection technique when Unity samples from the probes.

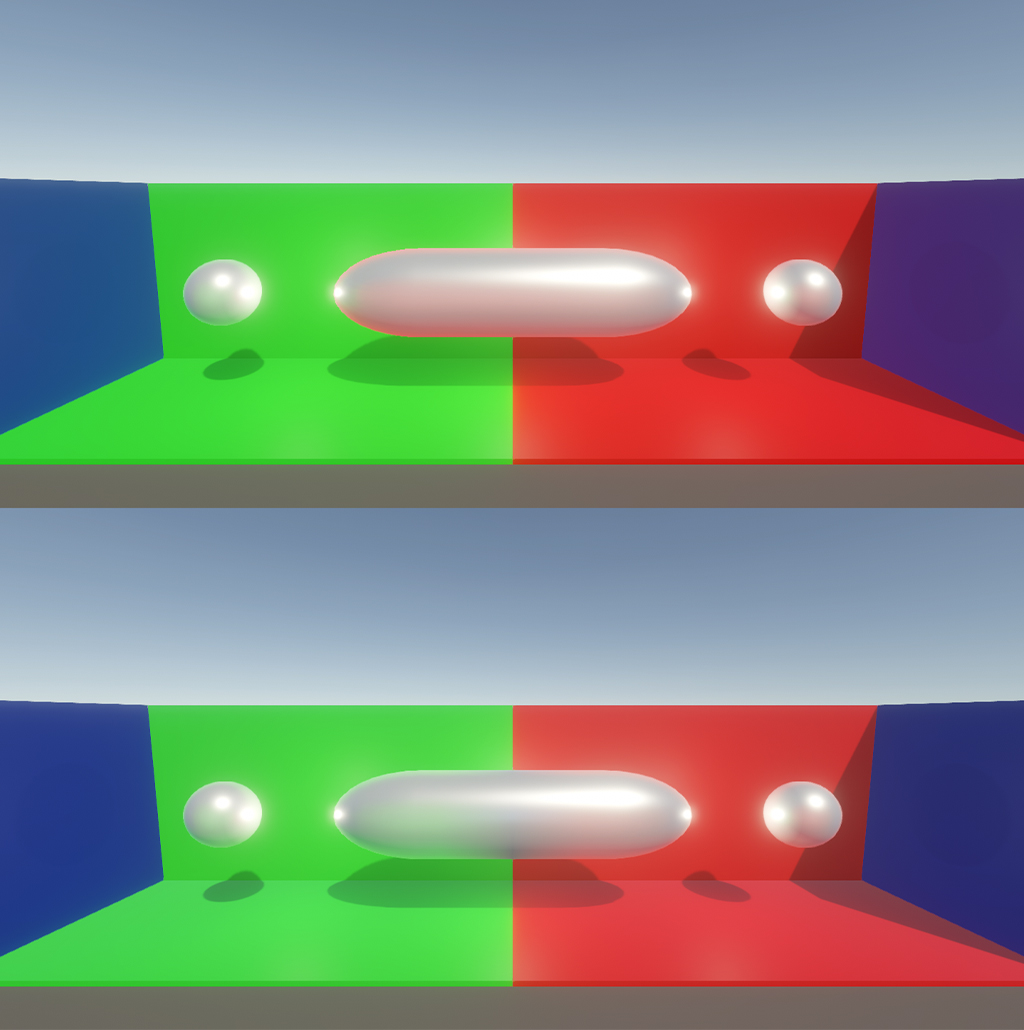
When the Blended Probes option is active, URP evaluates up to two separate Reflection Probes, sampling from each probe (if it influences the pixel sufficiently, based on the bounding box and blend distance). If the combined weight of each probe is below a threshold of 0.99f, URP uses the Ambient Probe as well. This provides superior reflection quality, but as expected, requires more bandwidth and computing power for the shader, so it might not be appropriate for low-end devices.
The Box Projection technique, which you can use with Blended Probes, changes how URP samples reflections. If you disable the Box Reflection technique, URP treats reflections as if their source is infinitely far away. This is cheap because all that’s needed for the calculation is a reflection vector for the Camera view relative to the Normal of a pixel. Visually, this can look like the reflection is the same, regardless of the object’s position – something that can be quite noticeable in small, enclosed scenes.

When you enable Box Projection in the URP Asset, URP handles Reflection Probes differently. In particular, URP treats the reflection as finite and adjusts the reflection vector to map to the confines of the box. This results in a reflection that appears more localized; Any objects that use the same Reflection Probe receive reflections that better map to their locations.
Although this extra resource isn’t as demanding as Blended Probes, Box Projection adds to the complexity of the shader and affects performance. We recommend using it for indoor scenes and enclosed areas like streets. Box Projection also provides more convincing results for highly reflective surfaces like mirrors.
With the Built-in Render Pipeline, you can configure Reflection Probes per Mesh Renderer. The 2021.2 version of URP does not have this option because URP’s implementation for both Forward and Deferred causes that value to be inaccessible – and altering it would break the Reflection Probe blending. If you upgrade an older project to 2021 LTS, be sure to set it to the default Blend Probes option before you upgrade.


You can activate Mixed Lighting and Light Layers with URP Asset properties. By default, these options are not visible. Click on the three dot icon (⋮) in the top-right corner of the Inspector, and select Show Additional Properties to expose them, or adjust them in the Core Render Pipeline settings (Preferences > Core Render Pipeline).
Mixed Lighting is active by default, which allows dynamic lighting to interact with Baked Lights. To use this in your scenes, enable Baked Global Illumination and choose either the Subtractive or Shadowmask Mode in the Lighting window (Windows > Rendering > Lighting > Scene). If you disable Mixed Lighting, Unity removes the shader variants that include Mixed Lighting from the project at build time.
Light Layers, which are new to URP, let you set lights to a specific Render Layer, which is handy for lights that only impact certain geometry. Each light can have a custom Shadow Layer used to include or exclude geometry from the shadow passes for that light.
Shadows

Max Distance is a Global Setting that affects all shadows in your game. It’s the maximum distance from the Camera that Unity uses to render real-time shadows. For Directional lights, URP renders shadows into a shadow map. Max Distance determines how much of the Camera’s frustum, and how far from the Camera, the map covers or reaches. As additional shadows are positional, Unity excludes them from the shadow pass if they are too far from the Camera based on this distance. Unity does not give any pixel located further than this distance a shadow.
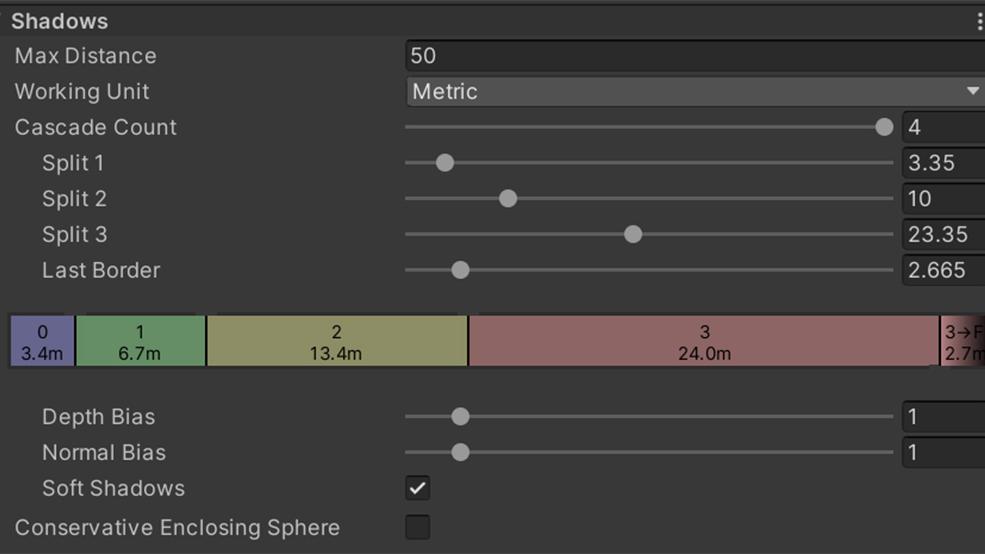
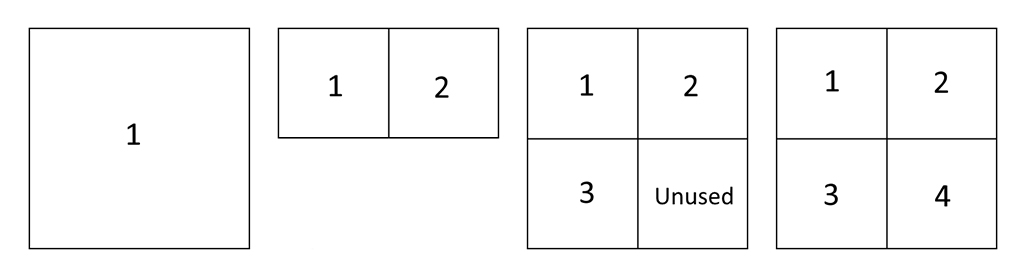
The Cascade Count setting makes it possible for you to set the number of cascades for the Main Directional light. Unity breaks the frustum up into these cascades to get higher detail for shadows closer to the Camera, while URP packs the cascades into the _MainLightShadowmapTexture. So if you set the Cascade Count to 1, URP uses the whole texture – otherwise, each cascade takes up a quarter of the Atlas (half the size of the Shadow Resolution).

The Working Unit option allows you to specify which units URP uses for the cascade splits. If you choose Metric, then URP measures the numbers that show in the splits using meters. On the other hand, Percent displays the percentage of the Max Distance for each split. You can manually adjust the splits by modifying the values in the Split fields. Alternatively, just drag the color-coded splits in the infographic below the Last Border property.
The Last Border property affects any pixel that receives a shadow, either from the Main Light or a shadow-casting punctual light. The Last Border value is the distance at which the URP fades out a shadow (a linear fade) when a pixel approaches the Max Distance.
The Depth Bias and Normal Bias settings control the default biases in your project. You can change the Bias settings to Custom and manually set your biases or tweak each light (as the screenshot below illustrates).


The Conservative Enclosing Sphere option is there to improve shadow frustum culling. If you enable it, Unity adjusts culling to better fit the cascade and avoid excessive shadow culling in the corner of the Shadow Cascades. However, this changes the size and position of the bounding spheres that URP uses to select the cascade, so you might need to adjust the cascade distances if you enable this option in an existing project.
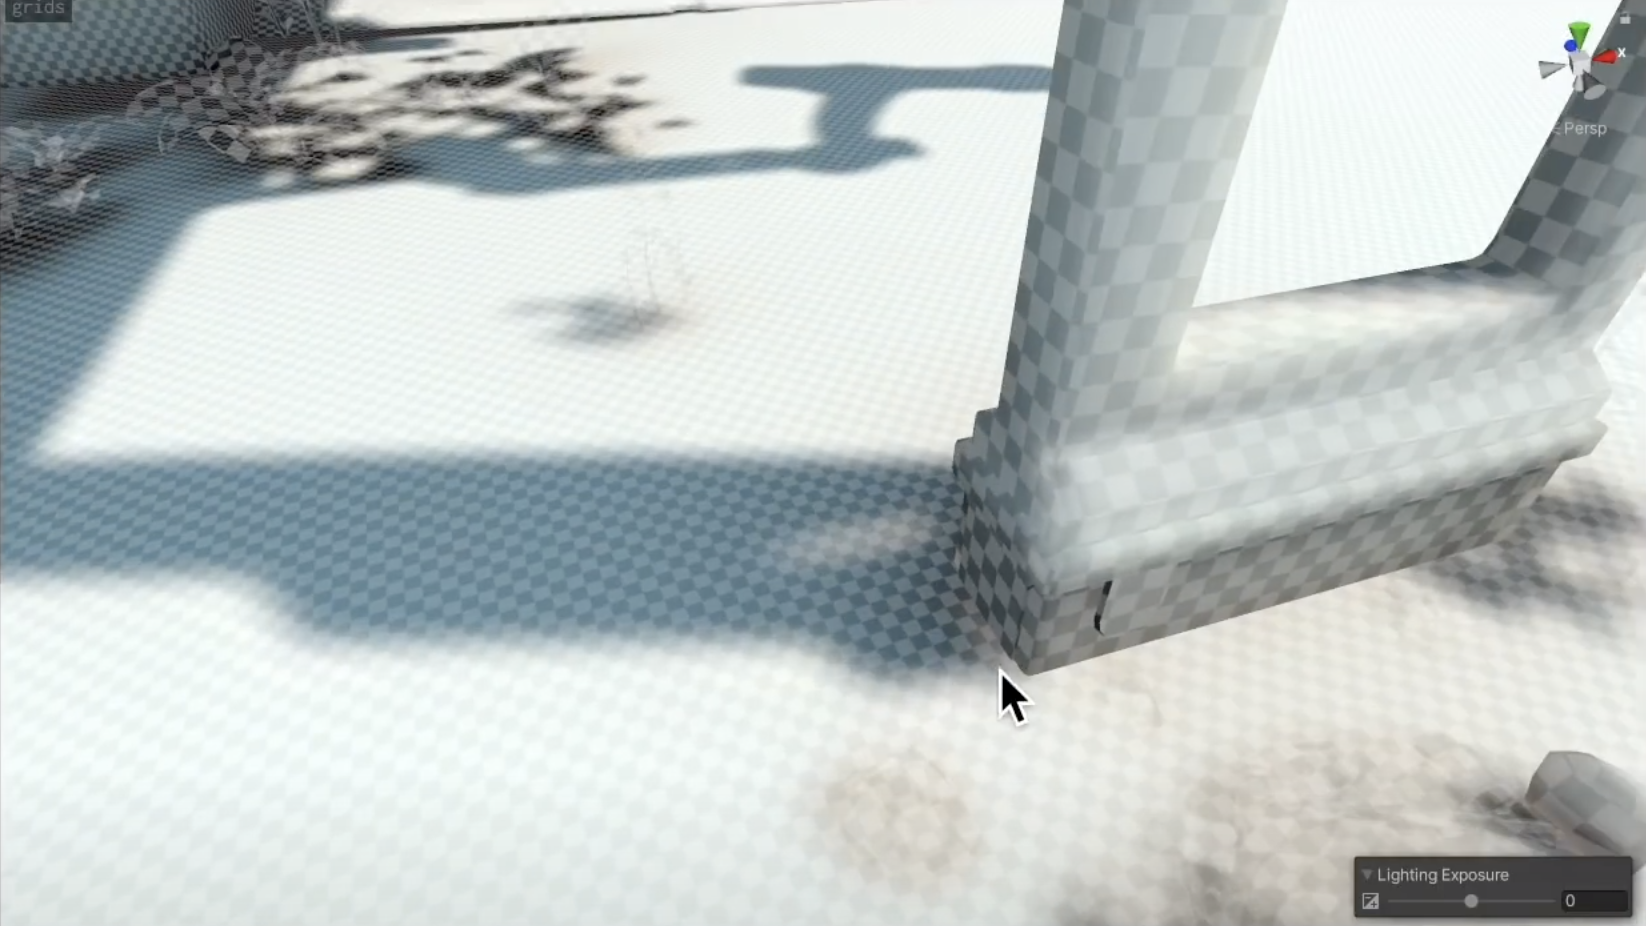
Even more, you can use Depth Bias and Normal Bias in the shadow pass to alter the results of the pass and resolve common shadowing issues, such as shadow acne (see Shadow troubleshooting in the documentation). The Depth Bias, essentially, pushes geometry away from the light in the shadow pass, while the Normal Bias shrinks the Shadow Caster where the Normal faces away from the light.
The effect of this is that URP pushes the Shadow Caster away from the light to reduce self-shadowing, but remains within the original bounds, thus reducing self-shadowing bugs. Unity calculates the overall amount that URP moves the caster by, based on the frustum and resolution size multiplied by the Bias set in the URP Asset or light.
The default values should be fine in most cases. When you have artifacts, focus on finding decent values, and tweak each light separately when possible.

The Soft Shadow option is a Global Override for Soft Shadow support in URP. When active, URP supports Hard and Soft Shadows for all lights, which can impact the performance of your shaders. So, for low-end platforms, it’s best to add a Quality Level that does not use this feature.
Unity needs to sample multiple times (four times for mobile and untethered devices, and nine times for other platforms) on the shadow texture, each time URP renders a pixel from a shader that supports shadows. That said, Soft Shadows are bandwidth intensive.
Multiple samples can cause more cache misses or memory fetches, making each pixel fractionally more resource intensive. Overdraw just compounds these bandwidth demands. That’s why, in Unity 2022.2 or newer, there is an option to control the quality (number of samples) of Soft Shadows per light.
Universal Renderer Asset Settings

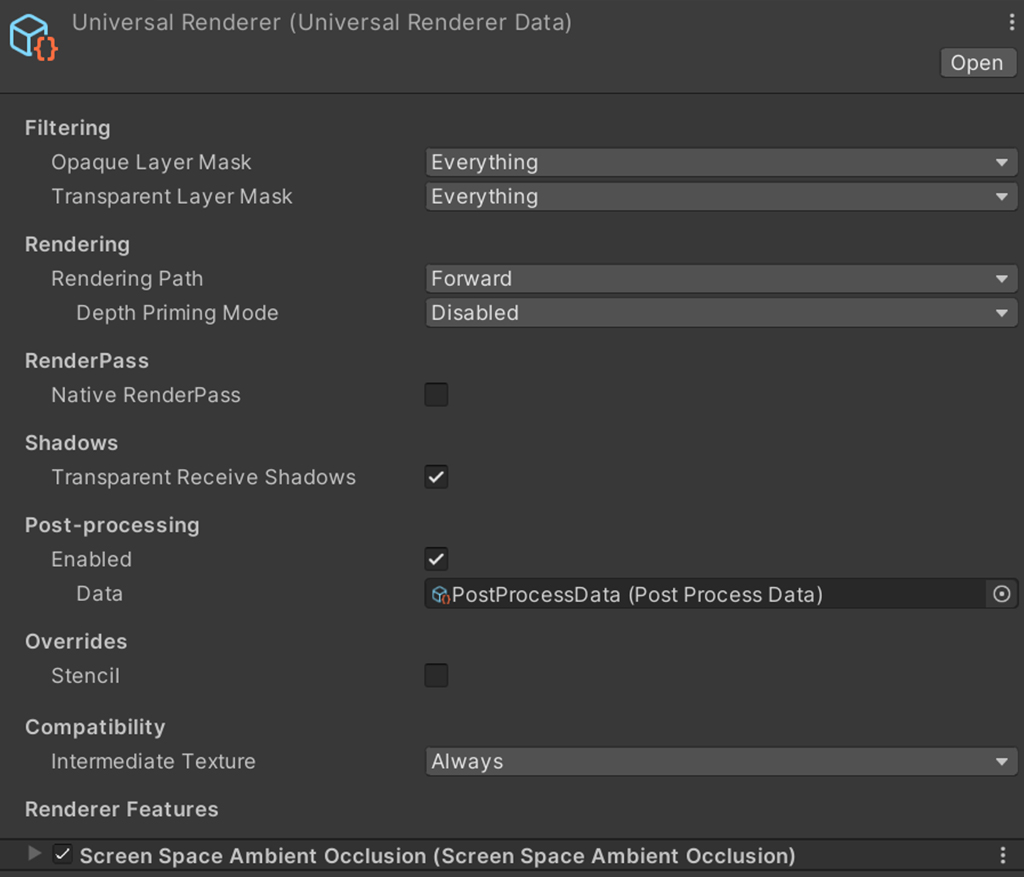
Unity uses the Universal Renderer to set up the way that URP renders a scene. Its Rendering section contains the Rendering path this asset uses, which can be Forward or Deferred.
The Forward Rendering path is the default path. It renders each object with all the valid lighting information for that specific object, within the limits set by the hardware and the URP Asset. If a project requires rendering support above these limits, consider using the Deferred path.
The Deferred Rendering path renders opaque geometry into a G-buffer. Unity uses the G-buffer in a Deferred Shading pass to render out each visible light. This means that objects with an Opaque material that use the Lit or Simple Lit shader can have a much higher number of lights affecting them. Some shaders, such as Complex Lit and Baked Lit, only use the Forward path, so URP renders them after the Deferred lighting pass. It’s worth mentioning that URP renders all transparent materials with the Forward path.
Another option (active by default) allows transparent objects to receive shadows. Unlike the Built-in Render Pipeline, URP supports transparent materials receiving shadows (though it does not support transparent objects casting shadows).
A Renderer Feature for Screen Space Ambient Occlusion (SSAO) is part of the URP package, under the Renderer Feature section of the asset. It can produce more realistic shadowing in a scene.
Lighting window
The Lighting window (Window > Rendering > Lighting) contains settings for baked lighting, environmental values (skybox, fog, sun), and reflections. While there are no critical differences between the Lighting Settings in the Built-in Render Pipeline and URP, there are two exceptions to take note of: In URP, the Lens Flare (SRP) component handles Lens Flares, and there’s currently no support for Halos.
Each scene can point to a Lighting Settings file that contains shared settings. You must create multiple settings to maintain unique settings for different scenes. These settings are broken into four sections: Scene, Environment, Real-time lightmaps, and Baked lightmaps.
As there are no substantial differences between the Lighting windows in URP and the Built-In Render Pipeline, it is out of scope for this post. But if you’re new to Unity, we recommend reading the Lighting documentation and trying out the beginner tutorials on Unity Learn to get caught up.
Lighting models
The URP provides three lighting models you can use for your project:
- Physically Based with the Lit and Complex Lit shaders
- Simple (based on the Blinn-Phong model) with the Simple Lit shader
- Baked Lit with the Baked Lit shader
All three models are distinct. It would be unusual to mix them together, but it could create a unique look in some instances. It’s typically best to just choose one and stick to it, even though mixing Baked Lit geometry with Lit or Simple shaders can help you achieve stronger performance.

Physically Based lighting in URP is based on a minimalist Cook-Torrance BRDF. It’s more resource intensive than Blinn-Phong, but also renders materials in a more physically correct manner to amplify your visuals – whether you’re aiming for gritty realism or something cartoonish.
The Complex Lit shader is a superset of the Lit shader and provides an extra feature, Clear Coat, which simulates a thin transparent layer on top of a material. Note, however, that Clear Coat is twice as resource intensive as the Complex Lit shader on its own because URP has to evaluate the lighting twice.
Meanwhile, the Simple Lit shader’s Blinn-Phong model is a simple, non-physically correct model that has been around for years. Many classic games have used this model, mostly due to hardware limitations. It’s a good choice when the art style fits a non-Physically Based approach, such as when you want to recreate a retro video game feel.
Finally, the Baked Lit shader only uses lightmaps or Light Probes to light objects. It isn’t physically correct but provides a cheap way to render your objects. The only downside is that, because it only evaluates the lightmaps or Light Probes, you lose out on reflections and dynamic lights.
Consider using Simple Lit when:
- The art style for the project is non-physically correct (e.g., Minecraft, Kentucky Route Zero, Monument Valley) and you want to mimic the look of a classic game.
Consider using Lit and/or Complex Lit when:
- The art style requires physically based rendering (PBR), or PBR enhances the overall art style.
Consider using Baked Lit when:
- You do not need real-time lighting, and the lack of reflections does not adversely affect your project’s visual quality. Or perhaps, you want to target a performance profile compatible with low-end platforms, and are open to committing a significant amount of memory to store lightmaps.
If you want to learn more about URP, get our free guide today. The guide is tailored to experienced Unity developers and technical artists looking to migrate their projects from the Built-in Render Pipeline to the Universal Render Pipeline. This e-book also provides new Unity developers with an in-depth introduction to URP.
Is this article helpful for you?
Thank you for your feedback!
- Unity Labs
- Copyright © 2024 Unity Technologies