Migrating built-in shaders to the Universal Render Pipeline


This blog post was created in collaboration with Roberto Lopez Mendez from Arm. Our partners at Arm recently ported a project based on Unity’s Built-in Render Pipeline to the Universal Render Pipeline (URP) and decided to share their experience with the Unity community.
URP is a prebuilt implementation of the Scriptable Render Pipeline (SRP). It offers artist-friendly workflows that allow for highly optimized graphics across a range of platforms. By working with tools such as Shader Graph and VFX Graph, URP enables non-programmers to author shader- and GPU-based effects.
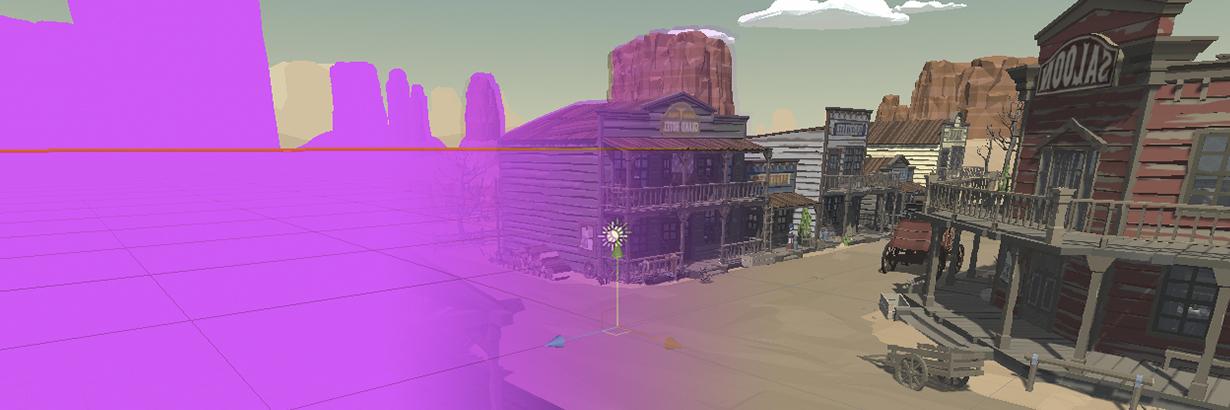
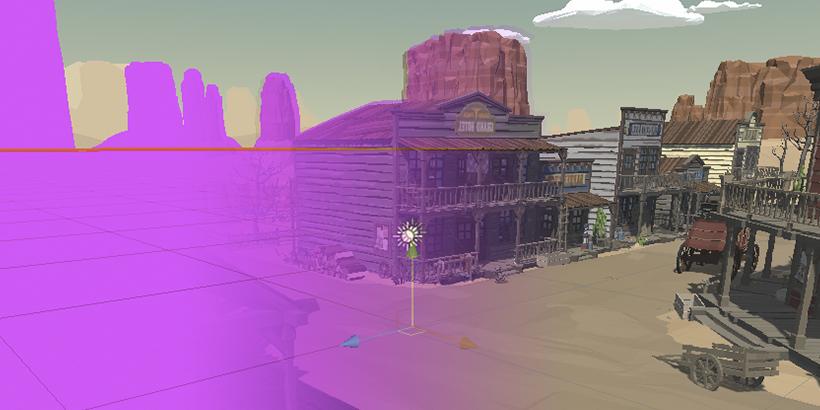
URP provides creators with a balance of performance and quality, and supports a number of features that facilitate the deployment of games and applications with high-quality visuals to multiple mobile devices. If you want to migrate a project from the Built-In Render Pipeline to URP, you’ll need to complete some manual steps to convert the shaders.
In this blog, we discuss the Arm project that was converted to URP, which involved the implementation of Dynamic Soft Shadows Based on Local Cubemaps in a custom shader. This post covers automatic shader conversion from built-in to URP, custom shader conversion, dealing with LightMode tags, and post-processing.

Find these tips and many others in our Introduction to the Universal Render Pipeline for advanced Unity creators e-book. Experienced Unity developers and technical artists alike can follow along to migrate their projects from the Built-in Render Pipeline to URP.
Porting shaders to URP: The basics
Start by adding the URP package to your project. Select Window > Package Manager to open the Package Manager and install Universal RP from the list of packages. When you run the shader upgrade, go to Edit > Render Pipeline > Universal Render Pipeline > Upgrade Project Materials to URPipeline Materials. These steps ensure that Unity built-in shaders convert automatically to a set of URP shaders.
Check out additional resources for converting built-in shaders to URP, like this tutorial alongside our documentation on upgrading your shaders. In this guide, you’ll benefit from a large table that depicts which built-in shaders convert to specific URP shaders. As you’ll notice, almost all legacy shaders convert to the Universal Render Pipeline/Simple Lit shader.
Comparing source code of legacy and URP shaders
One quick exercise for understanding what happens ‘under the hood’ during the conversion process is to look at the source code of both the legacy and URP shaders. Begin by downloading built-in shaders from the Unity download archive. Click on any of the download options for Windows or Mac and select Built-in shaders. Unzip the file and you’ll see more than 280 shaders grouped in different folders.
Let’s take the Mobile-Diffuse shader as an example. This shader is converted to a URP/Simple Lit shader. You can find many URP shaders part of the URP GitHub repo in the Shaders folder, as well as in Unity engineer Felipe Lira’s GitHub UniversalShaderExamples.
For their project, the developers at Arm decided to use the sample scene included in the URP Template. They selected the GameObject named “Drywall panel,” changed its shader from URP/Lit to URP/Simple Lit, followed by the Edit option to access its source code.
The first thing to notice when comparing URP SimpleLit.shader with Mobile-Diffuse.shader is the use of the key-value pair “RenderPipeline” = “UniversalPipeline” in the SubShader tag:
A SubShader tag named “RenderPipeline” tells Unity which render pipelines to use the SubShader with. The value of “UniversalPipeline” indicates that Unity should use this SubShader with URP.
Looking at the Render Pass code, you can see that the shader code is delimited using the HLSLPROGRAM/ENDHLSL macros:
These macros indicate that the former CG shader programming language (C for Graphics) has been replaced by High-Level Shading Language (HLSL), although the shader syntax and functionality are basically identical. Shader files in Unity are written using the ShaderLab syntax to define shader properties, SubShaders, and Passes. For URP, the shader code inside those Passes is written in HLSL.
While most of the ShaderLab hasn’t changed compared to the Built-In Render Pipeline, shaders written for that pipeline are automatically disabled by the URP due to changes in the internal lighting process between the two pipelines. This means that shaders handle lighting differently in URP compared to the Built-in Render Pipeline.
The Built-in Render Pipeline performs separate shader passes for every light that reaches an object, whereas URP handles all lighting and shading in a single Pass via arrays. This difference leads to distinct structures for storing light data in URP as well as new shading libraries with new conventions.
Unity will use the first SubShader block that is supported on the GPU. If the first SubShader block doesn’t have a “RenderPipeline” = “UniversalPipeline” tag, it won’t run in URP. Instead, Unity will try to run the next SubShader (if any). If none of the SubShaders are supported, Unity will render the well-known magenta-colored error shader.
A SubShader can contain multiple Pass blocks, but each of them should be tagged with a specific LightMode. As URP uses a single-pass Forward Renderer, only the first “UniversalForward” Pass supported by the GPU will be used to render objects.
Fortunately, the shader upgrader does the hard work for you and automatically converts Unity’s built-in shaders to URP shaders. But what about custom shaders?
Custom shaders
Custom shaders require additional work when upgrading to URP. One of the first steps you’ll need to take is to replace .cginc include files with their HLSL equivalents.
| .cginc | HLSL |
|---|---|
| UnityCG.cginc | GitHub link |
| AutoLight.cginc | GitHub link GitHub link |
Other useful HLSL includes
Built-in shader functions are fundamental for shader coding. Not only do they save you time, they also optimize implementations of commonly used calculations. Take this include file, for example. It contains several built-in functions related to some platform-specific capabilities, common math functions, texture utilities, texture format sampling, depth encoding/decoding, space transformations, terrain/brush heightmap encoding/decoding, and miscellaneous utilities.
You’ll find reference tables for transform-related functions and preprocessor macros in both built-in and URP shaders in the Introduction to the Universal Render Pipeline for advanced Unity creators e-book.
Porting shaders to URP: Advanced steps
LightMode tags
The LightMode tag defines the role of the Pass in the lighting pipeline. In the Built-in Render Pipeline, most shaders that need to interact with lighting are written as surface shaders with all the necessary details taken care of. However, custom built-in shaders need to use the LightMode tag to specify how the Pass is considered in the lighting pipeline.
The table below indicates the correspondence between the LightMode tags used in the Built-in Render Pipeline and the tags that URP expects. Several legacy Built-in Render Pipeline tags are not supported at all in URP:
- MotionVectors
- PrepassBase
- PrepassFinal
- Vertex
- VertexLMRGBM
- VertexLM
At the same time, there are other tags in URP with no equivalent in the Built-in Render Pipeline.
| Built-in (read more here) | Description | URP (read more here) |
|---|---|---|
| Always | Always rendered; no lighting applied | Not supported |
| ForwardBase | Used in Forward rendering; Ambient, main Directional light, vertex/SH lights, and lightmaps applied | UniversalForward |
| ForwardAdd | Used in Forward rendering; Additive per-pixel lights applied, one Pass per light | UniversalForward |
| Deferred | Used in Deferred Shading; renders G-buffer | UniversalGBuffer |
| ShadowCaster | Renders object depth into the shadow map or a depth texture | ShadowCaster |
| MotionVectors | Used to calculate per-object motion vectors | MotionVectors |
| - | URP uses this tag value in the Forward rendering path; The Pass renders object geometry and evaluates all light contributions. | UniversalForwardOnly |
| - | URP uses this tag value in the 2D Renderer; The Pass renders objects and evaluates 2D light contributions. | Universal2D |
| - | The Pass renders only depth information from the perspective of a Camera into a depth texture. | DepthOnly |
| Meta | This Pass is executed only when baking lightmaps in the Unity Editor; Unity strips this Pass from shaders when building a Player. | Meta |
| - | Use this tag value to draw an extra Pass when rendering objects; It is valid for both the Forward and Deferred rendering paths. URP uses this tag value as the default value when a Pass does not have a LightMode tag. | SRPDefaultUnlit |
Replacement shaders
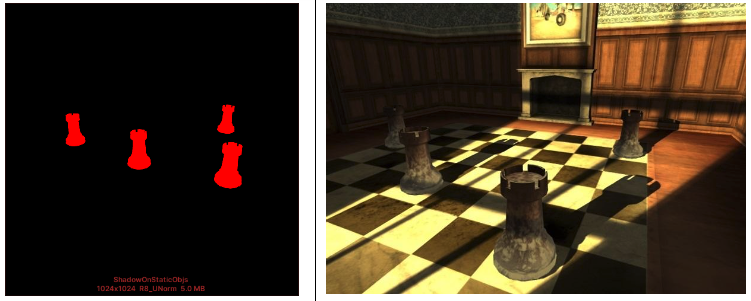
URP doesn’t support replacement shaders at this time. The Dynamic Soft Shadows Based on Local Cubemaps project, originally written for the Built-in Render Pipeline, uses a replacement shader to render the chess pieces, pictured below, with the simple Custom/ctShadowMap shader.
The shadow camera is placed at the light position. It uses the shader to render the geometry of the chess pieces to a texture. The resulting texture is later projected on the chessboard to produce the shadows from the chess pieces.

Note, however, that there is an alternative to using a replacement shader in URP. See the process outlined here, which demonstrates how the shadows from the chess pieces could work (more detailed information can be found in the Readme file of the project shared on the Unity Asset Store):
- Create a new URP Renderer Asset by right-clicking in the Project window. Then select Create > Rendering > Universal Render Pipeline > Forward Renderer, and name it, for example, Camera Replacement Renderer.
- Click on the Camera Replacement Renderer Asset to edit its properties.
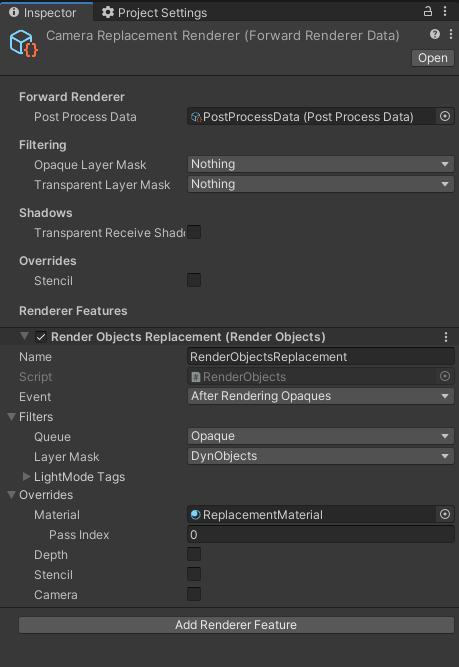
- Change filtering by setting both Opaque Layer Mask and Transparent Layer Mask to Nothing. This disables normal Camera rendering (otherwise, everything gets rendered twice).
- Click on Add Renderer Feature and select Render Objects (Experimental).
- Click on the newly created New Render Objects (Render Objects) and rename it. Several options will be listed, including:
- Set Filters > Layer Mask to the layers you want to render.
- Set Overrides > Material to a material that’s using your replacement shader.
- Select Assets/Settings/UniversalRP-HighQuality.asset, click + to add a new renderer, and drag and drop the Camera Replacement Renderer Asset you created.
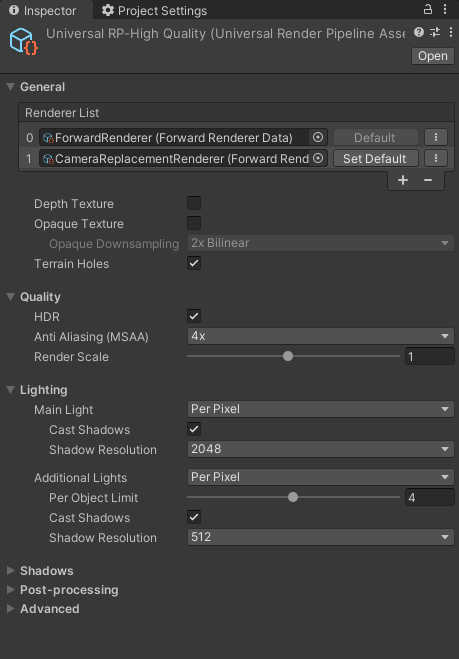
- Select the camera that was using the replacement shader and set Renderer to the new URP Renderer Asset you configured for the Camera Replacement Renderer:

Post-processing
The available post-processing effects depend on the rendering pipeline in use. Post-processing in the Built-in Render Pipeline is not compatible with URP post-processing. Here’s a handy comparison:
| Built-in | URP |
|---|---|
| Does not include a post-processing solution by default; To leverage post-processing effects, use the Package Manager to download the Post-Processing Version 2 package, also known as Post-Processing Stack V2 (PPv2). | Includes its own post-processing solution, which Unity installs when creating a project via the URP Template; See the URP post-processing documentation. To leverage post-processing effects, use the integrated Volume system, also known as Post-Processing V3/PPv3. This includes effects such as Bloom, Chromatic Aberration, Depth of Field, Color Adjustments, Tonemapping, and Vignette. |
When developing URP for Unity 2019.3, an integrated post-processing stack was implemented, which delivered several performance improvements to the pipeline. The updated stack was also meant to support new effects like Camera Motion Blur and the Volume framework.
However, PPv3 does not support custom post-processing effects, so support for PPv2 is still available as a fallback only in 2019.4 LTS. If custom effects are required in 2019.4 LTS, set the post-processing Feature Set from the integrated solution to Post-Processing V2 if it’s installed.
Post-processing is an expensive operation on mobile as these effects can take up a lot of frame time. If you’re using URP for mobile devices, here are the mobile-friendly effects:
- Bloom (with High-Quality Filtering disabled)
- Chromatic Aberration
- Color Grading
- Lens Distortion
- Vignette
Start porting your shaders today
The introduction of SRPs has been one of the biggest transformations in Unity, thanks to their ability to schedule and configure rendering commands via C# scripts. URP is designed to efficiently create scalable graphics for smooth performance – ensuring maximum-quality graphics on high-end devices, and optimized performance on low-end devices.
The tables featured in this post show just a few samples of the available HLSL shader functions, macros, etc. The includes that are linked also contain many other useful functions. You can explore these includes, such as the CG includes located in the Unity installation folder, to get a clear idea of what is available in HLSL to write your own compact shaders.
Hopefully porting your shaders to URP won’t seem so daunting after checking these resources. Please feel free to share your own experiences and ask any questions you might have in the URP forum.
Is this article helpful for you?
Thank you for your feedback!
- Unity Labs
- Copyright © 2024 Unity Technologies